Balloon Wedding Centerpieces: 15 DIY Ideas + Step-by-Step Guide
Quick Answer: Balloon wedding centerpieces cost $3–8 per table and take 15–30 minutes to assemble with the right supplies. Use 11-inch and 5-inch balloons in your color scheme, anchor them in a weighted base, tie with ribbon, and layer in greenery or flowers for polish. Most can be made 2–3 days ahead if stored in a cool room.
Balloon centerpieces are one of the easiest DIY wins you can add to your wedding day. They’re surprisingly forgiving to make, hold up well through an entire event, and genuinely look intentional when you use the right technique. The secret? It’s not magic—it’s understanding which balloons to choose, how to weight them properly, and how to layer them so they feel full and polished instead of sparse.
By the end of this guide, you’ll have a step-by-step build process, a complete supply checklist, and 15 design ideas that match your wedding theme. You’ll also know exactly when to make them, how to store them, and how to troubleshoot the common mistakes that derail most DIY efforts.
Let’s walk through how to create centerpieces that make your guests say, “Did you hire someone for this?”
What You’ll Need: The Balloon Centerpiece Supply Checklist
The right supplies make the difference between a centerpiece that looks polished and one that looks like you grabbed a few balloons from a party store. Let’s break down exactly what to buy.
Balloon Sizes and Types
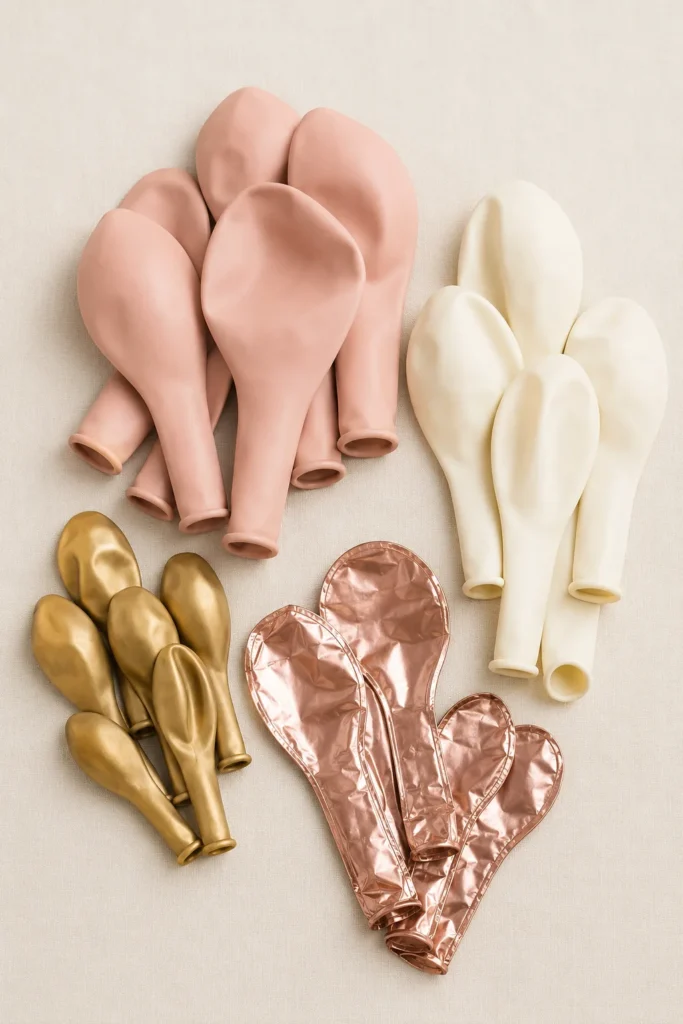
Your balloon choice is the foundation of the entire centerpiece. Not all balloons are created equal—and quality matters more than you’d think.
| Balloon Type | Best For | Durability | Cost Per Balloon | Why to Choose It |
|---|---|---|---|---|
| Latex (standard) | Most centerpieces; budget-conscious builds | 8–12 hours indoors; less in heat | $0.20–0.50 | Affordable, easy to tie, natural matte finish looks elegant |
| Latex (pearl or matte finish) | Upscale, formal weddings | 8–12 hours indoors | $0.50–0.80 | Premium finish; pearl sheen reads as more expensive |
| Foil/Mylar (metallic) | Accent balloons; color pop | 7+ days | $0.80–1.50 | Long-lasting; metallic sheen adds visual interest; pairs beautifully with latex |
| Specialty (confetti-filled, ombré) | Statement centerpieces; trending weddings | 8–12 hours | $1.50–3.00 | High visual impact; makes a modern statement; may not fit all themes |
Balloon sizes matter too. For wedding centerpieces, you’ll want a mix of sizes to create visual fullness without overwhelming the table:
- 11-inch balloons (large): These are your statement makers. Use 3–4 per centerpiece for impact.
- 5-inch balloons (small): These fill gaps and create volume. Use 5–7 per centerpiece.
- Pro tip: If you can only find 9-inch balloons, they work fine as a mid-range option between large and small.
Quality upgrade: Invest in higher-quality latex balloons if your budget allows. Cheap balloons pop more easily and deflate faster. Wedding-grade balloons hold up better through setup and the entire event.
Base and Weighting Options
A pretty centerpiece that tips over is a disaster. Weighting is non-negotiable. Here’s what works:
| Weighting Method | Cost | Stability | Look | Best For |
|---|---|---|---|---|
| Floral foam in a vase | $2–4 | Excellent | Clean, polished | Most centerpieces; pairs with greenery and flowers |
| Sand or pebbles in a weighted vase | $1–2 | Excellent | Very clean (can hide with tall vase) | Modern or minimalist weddings; budget-friendly |
| Water-filled clear bottle wrapped in ribbon | $0.50–1 | Good | Budget; can look DIY if not styled well | Emergency backup; rustic themes if styled intentionally |
| Floral clay or Blu Tack | $1–2 | Fair (good for smaller builds) | Invisible if done right | Lightweight centerpieces; as a secondary anchor |
My recommendation: Use floral foam in a clear or colored vase. It’s the most stable, gives you flexibility to add flowers and greenery, and looks intentional. A 12-inch cylinder vase with floral foam gives you the perfect foundation.
Fillers, Greenery, and Ribbon
Balloons alone feel empty. Greenery and filler flowers bridge the gaps and elevate the whole arrangement.
- Greenery options: Fresh eucalyptus (lasts 3–5 days), Italian ruscus (lasts longer), or artificial garland (lasts indefinitely). Budget eucalyptus $1–2 per stem. Artificial runs $3–5 per strand but eliminates the “is it fresh?” stress.
- Filler flowers: Baby’s breath, waxflower, or spray roses. $0.50–1 per stem. Fresh flowers will start to wilt by evening, so artificial filler works just as well and lasts all night.
- Ribbon: Satin, grosgrain, or silk ribbon in your wedding color. Choose 1.5- to 2-inch width for impact. Budget $0.10–0.30 per yard.
- Floral tape: Green floral tape ($1–2 per roll) secures greenery stems to the base and keeps everything organized.
- Air pump: This is non-negotiable if you’re making more than 5 centerpieces. Manual pumps cost $3–5. Electric pumps cost $10–20 and save hours of hand-pumping. Absolutely worth it.
Download your complete supply checklist: I’ve created a printable checklist organized by category—balloons, base, tools, fillers—so you can shop without forgetting anything. It’s free and gated for email subscribers.
How to Build a Balloon Wedding Centerpiece: Step-by-Step
This is where the magic happens. Follow these five steps and you’ll have a centerpiece that looks professionally designed. I’ve broken it down so you can do this even if you’ve never assembled a floral arrangement before.
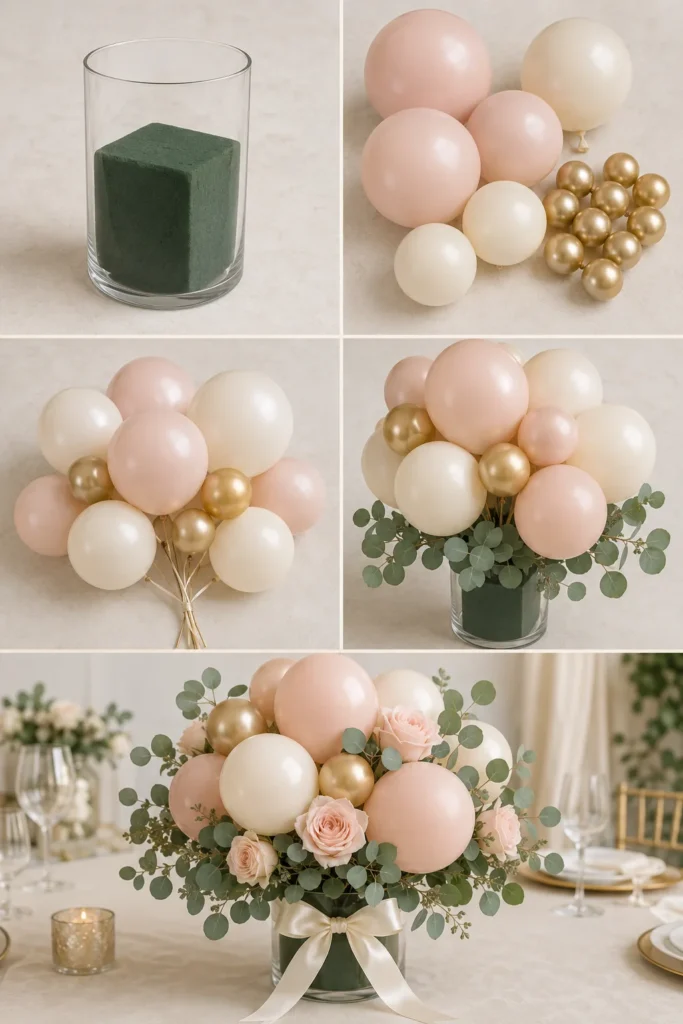
Step 1: Prepare Your Base and Weights
- Cut and soak your floral foam: Cut a block of floral foam to fit snugly inside your vase. If using a 12-inch cylinder vase, you’ll need about 2/3 of a standard block. Soak it in water for 30 seconds (not too long—you don’t want it soggy). Place it in the vase so it sits slightly above the rim. This gives you room to insert stems.
- Secure the base: Use floral tape across the top of the vase to hold the foam in place. This prevents shifting during transport and setup.
- Test stability: Gently push on the vase. It should not tip. If it does, your foam isn’t secure enough or your vase isn’t heavy enough. Add sand or pebbles to the bottom of the vase before inserting the foam.
Step 2: Inflate and Organize Your Balloons
- Inflate to the right size: Large balloons (11-inch) should feel firm but not rock-hard. You should be able to press gently without feeling like it will pop. Overinflated balloons pop more easily and look awkward. Underinflated balloons look sad. Aim for the middle ground.
- Tie with an airlock knot: Don’t tie balloons too tightly. Use a standard balloon tie or an airlock knot (search YouTube for the 5-second tutorial). This prevents the knot from strangling the balloon and causing slow leaks.
- Organize by size and color: Lay out all your balloons before assembling. Group large balloons together, small balloons together. This helps you see the color balance and prevents mid-assembly scrambling.
Step 3: Create Clusters and Layer
- Start with the large balloons: Take 3–4 large balloons and tie their strings together loosely (you’re not making a tight knot—you’re just bunching them so they cluster). Arrange them so they sit at different heights. One should be tallest, others slightly shorter. This creates visual interest.
- Add small balloons around the large ones: Now take 5–7 small balloons and weave them around the cluster of large balloons. Tie or tuck them so they fill gaps. You’re aiming for a full look without it feeling crowded.
- Adjust heights: Step back and look at your cluster. Are the balloons at varied heights? Do they feel balanced? Make micro-adjustments now. Tie strings to different points on the large balloons to create different levels.
- Anchor to the base: Once your cluster looks right, tie the string to the floral foam (wrap it around the foam block) or use a floral pick to anchor it. You want it stable but not so tight that it restricts movement.
Step 4: Add Greenery, Flowers, and Ribbon
- Insert greenery stems into the foam: Cut eucalyptus or ruscus into 8–10 inch stems. Insert them into the foam around the balloon cluster, filling in visible gaps. You should barely see foam once you’re done. Aim for a “fuller” look—a little greenery goes a long way.
- Layer in filler flowers: Insert small flowers (baby’s breath, waxflower, spray roses) into the gaps. These add color, texture, and dimension. Vary the heights so flowers aren’t all at the same level.
- Tie a ribbon bow or knot: Choose a ribbon in your wedding color. Tie it around the base of the balloon cluster or around the vase itself. A simple bow or loose knot works beautifully. This is your finishing touch—it ties the whole arrangement together and makes it feel intentional.
Step 5: Test Stability and Final Tweaks
- The gentle nudge test: Carefully push on the centerpiece from different angles. Does it feel stable? Does it sway slightly but not tip? That’s perfect. If it feels wobbly, add more weight to the base or secure the balloon cluster more firmly to the foam.
- The transport test: Imagine carrying this to a table. Does anything feel like it might shift? Tighten any loose strings or adjust greenery that sticks out awkwardly.
- The visual test: Step back 3–4 feet and look at the whole centerpiece. Does it look balanced? Are there any huge gaps? Do the colors read cohesively? Make final adjustments to greenery placement or add an extra small balloon if it needs more fullness.
Timing: When to Make Your Balloon Centerpieces
One of the biggest questions I get from wedding-planning is: “When do I actually make these?” Timing matters more than you’d think, especially if you’re worried about deflation, heat, or storage.
How Far Ahead Can You Make Them?
The short answer: 2–3 days ahead is ideal. More than that risks deflation.
Latex balloons can be made up to 3 days in advance if stored properly, but quality starts to degrade after 48 hours. If you have fresh flowers or greenery that will wilt, it’s better to wait until 1–2 days before the wedding to assemble completely. You can prep the bases and inflate balloons ahead of time, then do final assembly the day before or morning of.
Breaking it down by timeline:
- One week before: Buy all supplies. Test one centerpiece to make sure your design works and your base is stable.
- 2–3 days before: Inflate all balloons. Store in a cool room. Tie them loosely so they don’t get kinks or flat spots.
- 1–2 days before: Assemble all centerpieces. Insert greenery and flowers. Tie ribbons. Store in a cool room away from direct sunlight.
- Morning of wedding: Quick visual check. Fluff any greenery that got pressed. Do a gentle nudge test on each centerpiece. Transport carefully to the venue.
Storage Tips to Keep Balloons Fresh
Heat and direct sunlight are balloon killers. Humidity matters too—too dry, and latex can get sticky. Too humid, and they deflate faster. Here’s how to store them properly:
- Keep them cool: Store in a room that stays between 60–75°F. Avoid kitchens (heat from cooking), garages (temperature swings), or anywhere near heating vents. A bedroom or living room away from windows is ideal.
- Keep them away from sunlight: UV rays degrade latex. Store in a closet or away from windows.
- Keep them untouched: Don’t lean other items against them or stack things on top. Balloons need breathing room.
- Keep them inflated: Overinflated balloons deflate; slightly underinflated ones hold better. Aim for that sweet spot.
- Avoid rough surfaces: Store on soft surfaces or in boxes with padding. Even a single nick or rough edge can cause a slow leak.
Day-of Setup Timeline
On the morning of the wedding, give yourself 2–3 hours before guests arrive to do final setup. Here’s the timeline:
- 2.5 hours before guests arrive: Load centerpieces carefully into your car. Transport them flat or upright but never tilted. Rough handling can cause deflation or popping.
- 2 hours before: Unload and place centerpieces on tables. Do a quick visual check on each one. Fluff greenery if it got pressed during transport.
- 1.5 hours before: Take a final walk around the room. Any centerpieces that look off? Any balloons that deflated during transport? Have a few backup balloons on hand to quickly replace any stragglers.
- 30 minutes before: Final stability check. Gently nudge each one. Adjust ribbon if needed. You’re done.
Balloon Centerpiece Ideas by Wedding Theme: 15 DIY Designs
The best part about balloon centerpieces? You can match them to literally any wedding aesthetic. Here are 15 specific designs organized by theme. Check out our guide on rustic wedding centerpieces for more inspiration on natural, earthy themes, or explore royal blue wedding centerpieces for classic color combinations that work beautifully with balloons.
| Theme | Balloon Colors | Balloon Finishes | Greenery & Accents | Ribbon Tie | Why It Works |
|---|---|---|---|---|---|
| Garden Romance | Blush, ivory, sage green | Matte latex (soft, romantic feel) | Fresh eucalyptus, dusty miller, cream roses | Blush silk ribbon, bow | Soft, romantic, pairs beautifully with garden flowers already on tables |
| Modern Minimalist | White, gray, black (2 of 3 only) | Matte or metallic latex (clean lines) | Minimal greenery (just 2–3 stems of ruscus), no flowers | Sleek white or gray grosgrain, simple knot | Lets the balloon cluster be the statement; pairs well with modern table settings |
| Black Tie Formal | Gold, black, ivory | Metallic gold foil balloons mixed with pearl-finish latex | Minimal greenery; add one gold or ivory spray rose | Gold satin ribbon, elegant bow | Luxe, upscale look; metallic balloons read as high-end without breaking the budget |
| Rustic Boho | Terracotta, cream, olive green | Matte latex (natural feel) | Dried pampas grass, greenery, eucalyptus, wildflowers or baby’s breath | Natural twine or burlap ribbon, loose tie | Earthy, organic feel; works for barn weddings and outdoor settings |
| Summer Bright | Coral, yellow, mint, white | Matte latex (playful, not shiny) | Green foliage (any fresh greenery), white filler flowers | Coral or yellow grosgrain, simple knot | Happy, energetic feel; pairs well with casual, outdoor summer settings |
| Blush & Gold | Blush, rose gold, ivory | Matte blush + metallic rose gold foil balloons | Fresh eucalyptus, pink spray roses or carnations | Rose gold satin ribbon, bow | Romantic and luxe; one of the most popular wedding color schemes; photographs beautifully |
| Jewel Tone Glam | Emerald, navy, gold accent | Matte latex (emerald/navy) + metallic gold foil accent balloons | Dark greenery (eucalyptus or ruscus), one deep burgundy or emerald flower | Navy or emerald satin ribbon with a gold accent bow | Rich, sophisticated; works for fall and winter weddings; creates drama on the table |
| Millennial Pink | Millennial pink, white, metallic silver | Matte pink + metallic silver foil | Simple eucalyptus, white waxflower or baby’s breath | White or silver grosgrain ribbon, bow | Trendy, feminine, photograph-friendly; popular for Instagram-first couples |
| Classic Black & White | Black, white (50/50 split) | Matte latex, one metallic silver accent foil balloon per centerpiece | Minimal; just white or black flowers (roses, ranunculus) | Black satin ribbon with white accent bow or vice versa | Timeless, elegant, works for any season; creates visual impact through contrast |
| Peach & Cream | Peach, cream, blush | Matte latex (soft, warm feel) | Fresh eucalyptus, peach roses or ranunculus | Peach silk ribbon, bow | Warm, inviting; perfect for spring and fall weddings; feels friendly and approachable |
| Navy & Blush | Navy, blush, white | Matte latex (classic, timeless feel) | Fresh eucalyptus, blush roses, white spray rose | Navy grosgrain ribbon with blush bow accent | Preppy, romantic; works for traditional and modern weddings alike; very photogenic |
| Tropical Paradise | Bright pink, orange, yellow, lime green, white | Matte latex (playful, not metallic) | Tropical leaves (monstera, palm frond look-alikes), white flowers | Colorful grosgrain in matching hues or white contrast ribbon | Fun, energetic; works for destination weddings or outdoor summer celebrations |
| Dusty Blue Romance | Dusty blue, gray-blue, ivory, white | Matte latex (calming, soft feel) | Dusty miller, silver dollar eucalyptus, blue or white spray rose | Dusty blue silk ribbon, loose bow | Calm, sophisticated, romantic; pairs beautifully with metallic silver accents |
| Purple & Gold | Deep purple, lavender, gold accent | Matte purple + metallic gold foil balloons | Purple or gray eucalyptus, purple or white filler flowers | Gold satin ribbon with purple accent detail | Regal, luxe, uncommon enough to feel unique; works for formal and creative weddings |
| Soft Sage | Sage green, cream, white | Matte latex (natural, earthy feel) | Sage eucalyptus or ruscus, white flowers (baby’s breath, roses) | Sage ribbon or natural linen ribbon, simple knot or bow | Natural, calm, organic; works for garden, rustic, and minimalist weddings |
| Burgundy & Blush | Burgundy, blush, ivory | Matte latex (rich, moody feel) | Dark eucalyptus, burgundy roses or ranunculus, greenery | Burgundy or blush velvet ribbon, bow | Romantic, moody, elegant; perfect for fall and winter weddings; very photogenic |
Each of these designs has been tested for visual balance, color harmony, and practical feasibility. Pick the one that matches your wedding vibe, and you’re halfway to success. For more tablescape inspiration, explore spring wedding tablescape ideas to see how balloon centerpieces work within a full table design.
Budget Breakdown: Cost Per Centerpiece
Quick Answer: DIY balloon centerpieces cost $3–8 per table, compared to $75–150 for professional floral centerpieces. For a 100-guest wedding with 10 tables, you’ll spend $30–80 total on balloon centerpieces instead of $750–1,500 on professional florals. That’s a savings of $670–1,420.
Let’s break down the actual costs so you can see where your money is going and how much you’re actually saving:
| Supply Category | Item | Cost Per Item | Qty Needed (10 tables) | Total Cost | Cost Per Centerpiece |
|---|---|---|---|---|---|
| Balloons | 11-inch latex balloons (assorted pack of 100) | $8–12 | 1 pack | $8–12 | $0.80–1.20 |
| 5-inch latex balloons (assorted pack of 100) | $6–10 | 1 pack | $6–10 | $0.60–1.00 | |
| Foil/metallic accent balloons (if using) | $1.50 each | 10 | $15 | $1.50 | |
| Base & Anchors | Floral foam blocks (pack of 6) | $8–12 | 1 pack | $8–12 | $0.80–1.20 |
| Vases (clear cylinder, 12-inch) | $2–4 each | 10 | $20–40 | $2–4 | |
| Floral tape | $1–2 per roll | 1–2 rolls | $1–4 | $0.10–0.40 | |
| Greenery & Fillers | Fresh eucalyptus bundles | $3–5 per bundle (3–5 stems) | 2–3 bundles | $6–15 | $0.60–1.50 |
| Filler flowers (baby’s breath, waxflower, or spray roses) | $2–5 per bundle | 2–3 bundles | $4–15 | $0.40–1.50 | |
| Ribbon & Ties | Satin or silk ribbon (2-inch width, 25 yards) | $5–10 | 1 roll | $5–10 | $0.50–1.00 |
| Tools | Electric air pump | $10–20 | 1 | $10–20 | $1–2 (amortized) |
| TOTAL (10 Centerpieces) | $83–147 | $8.30–14.70 per centerpiece |
A few cost-saving notes:
- Skip the vases if you already have clear glasses or jars at home. Repurposing what you have saves $20–40.
- Use artificial greenery instead of fresh. Artificial eucalyptus costs $3–5 per strand and lasts indefinitely. Fresh eucalyptus wilts but costs less upfront. For a wedding, artificial is the smarter buy.
- Buy balloons in bulk online. Wholesale sites often have better pricing than party stores, especially for large quantities.
- Simplify your filler choices. A centerpiece with just balloons, greenery, and ribbon still looks polished. You don’t need filler flowers if you’re tight on budget.
- Amp up one table, keep others simple. If you have a sweetheart table or parents’ table, spend more on those centerpieces and keep the rest minimal. Most guests won’t notice the difference.
Upgrade Options: Balloon Stands & Holders
If you want a more structured look or need to use your tables for other purposes, balloon stand kits with bases are a game-changer. These adjustable stands let you position balloons at exactly the height you want without needing floral foam or vases on the table. Perfect if you’re renting linens or want maximum table space for place settings.
For a more polished, professional look, acrylic balloon stands with square bases offer elegant height adjustment and work beautifully for formal weddings. They’re reusable for future events and hold their weight extremely well.
Looking for something eye-catching? LED light-up balloons add a magical touch for evening receptions and look absolutely stunning in photos. They work especially well in the 15–20 balloons in clusters for statement impact.
And for the absolute most stability, balloon weights with metallic ribbon are your backup plan. Use them if your centerpieces feel even slightly wobbly, especially at outdoor venues or with air conditioning that creates air movement.
Common Mistakes and How to Avoid Them
I’ve watched enough DIY weddings to know which mistakes derail even well-intentioned plans. Here’s how to dodge them.
Mistake 1: Using Only Large Balloons
The problem: When your centerpiece only has big balloons, there are visible gaps. It looks sparse, unfinished, and smaller than you intended. The eye needs visual fullness to feel satisfied.
The fix: Use the 3-large + 5-small formula I mentioned in Step 3. Large balloons are your statement; small ones create volume and hide gaps. This single ratio changes everything.
Mistake 2: Choosing Heavy Fillers Without Proper Weighting
The problem: Tall branches, thick greenery, or heavy ceramic vases combined with an undersized base equals a centerpiece that tips over the moment a guest reaches for a napkin or a breeze hits it. This is a disaster at an outdoor wedding.
The fix: Test weight before the wedding. Before your big day, do a gentle nudge test on every centerpiece. If it sways dramatically or feels tippy, add weight to the base (sand, pebbles, water) or reduce the height of your fillers. Never compromise on stability for aesthetics.
Mistake 3: Making All Centerpieces Identical
The problem: Uniform arrangements look mass-produced and less intentional. Your eye actually wants to see slight variation.
The fix: Create variation within your color palette. If your theme is blush and gold, vary the ratio—some tables get more blush, others more gold. Vary heights. Vary the greenery density. This simple change makes a wedding feel more curated and less like you bought everything pre-made.
Mistake 4: Storing Balloons in Heat or Direct Sunlight
The problem: Latex balloons degrade quickly when exposed to heat or UV rays. Store them in a hot garage or sunny room, and they’ll deflate or become sticky by the next day. You’ll be reinflating balloons the morning of your wedding instead of enjoying coffee.
The fix: Store in a cool closet or interior room, away from windows and heat vents. Keep the temperature between 60–75°F. If you’re worried, test storage conditions with one centerpiece 3 days before the wedding. Deflation problems will show up before your wedding day if they’re going to happen at all.
Mistake 5: Tying Balloons Too Tightly
The problem: A too-tight knot constricts the balloon neck, which can cause slow leaks or even popping. You tie the balloon at 2 p.m., and by 6 p.m., it’s half-deflated.
The fix: Use a loose airlock knot (YouTube has great tutorials). The knot should secure the balloon without feeling like a stranglehold. A properly tied balloon will stay inflated all day.
Mistake 6: Buying Cheap Latex Balloons
The problem: Low-quality balloons pop easily, deflate faster, and feel thin and wrinkly. They make your entire centerpiece look cheap, no matter how much effort you put into greenery and styling.
The fix: Spend the extra $0.30–0.50 per balloon on wedding-grade or premium latex. It’s a small per-balloon cost, but the durability difference is huge. You’re not trying to save $10 on balloons only to have one pop during your reception.
Mistake 7: Not Testing Your Design Ahead of Time
The problem: You’ve never actually made this centerpiece before, so you wing it on your wedding day. Turns out the vase you chose is too narrow, or the floral foam doesn’t fit, or the balloons are way bigger than you thought. Panic ensues.
The fix: Make one complete centerpiece 1–2 weeks before the wedding. Use the exact supplies you’ll use on the big day. Check fit, stability, color balance, and timing. If something’s off, you have time to adjust your entire plan. This single test run prevents dozens of day-of problems.
FAQ: Balloon Centerpiece Questions
How much do DIY balloon centerpieces cost per table?
DIY balloon centerpieces cost $3–8 per table when you buy supplies in bulk. The exact cost depends on whether you use fresh or artificial greenery, whether you include filler flowers, and where you source balloons. For comparison, professional floral centerpieces typically cost $75–150 per table.
What size balloons are best for wedding centerpieces?
Mix 11-inch balloons (3–4 per centerpiece) with 5-inch balloons (5–7 per centerpiece). This combination creates visual fullness and balanced proportions. If you can’t find 5-inch balloons, 9-inch works as a mid-range option.
How do you keep balloon centerpieces from tipping over?
Use a weighted base—floral foam in a heavy vase, sand, or pebbles. Secure the balloon cluster firmly to the foam. Test stability with a gentle nudge from different angles before the wedding. Most tipping problems come from an undersized base or weak anchoring.
Can you make balloon centerpieces the night before the wedding?
Yes, if stored in a cool room (60–75°F) away from direct sunlight. Most ladies make centerpieces 1–2 days ahead. If you have fresh flowers or greenery, finish assembly the day before or morning of so they stay fresh through the event.
Do helium balloons work in wedding centerpieces?
Technically yes, but they’re impractical. Helium balloons float upward and need constant monitoring and anchoring. Air-filled balloons are stable, look just as polished, and never float away mid-celebration. Stick with air-filled.
How long do latex balloons last at a wedding?
Latex balloons last 8–12 hours indoors at room temperature. Heat and direct sunlight shorten their lifespan. If your wedding is outdoors in heat, budget for 6–8 hours of balloon durability. Foil/mylar balloons last 7+ days, so mix those in if you want insurance against deflation.
Can you use fresh flowers with balloon centerpieces?
Absolutely. Insert fresh flower stems into floral foam or a small water vial. Check freshness the morning of the wedding. Real flowers elevate the whole look—they add fragrance, delicate texture, and a romantic feel that balloons alone can’t create. Just make sure the stems stay hydrated.
What’s the easiest base weight for a balloon centerpiece?
A clear vase filled with sand or pebbles, topped with floral foam. Balloons tie into the foam; greenery hides the mechanics. It looks intentional, is very stable, and costs less than ceramic or decorative containers.
Will balloon centerpieces look cheap at a formal wedding?
Not if executed well. Use pearl-finish or matte latex balloons (not shiny primary colors), add fresh or high-quality artificial flowers, and anchor them in tasteful vases. Formal weddings actually look stunning with balloon centerpieces because the softness contrasts beautifully with formal table settings.
How do you transport balloon centerpieces without them popping?
Pack them carefully in large boxes with padding for short trips. For very long distances, consider deflating before transport and re-inflating at the venue. Secure vases with non-slip mats so they don’t slide. Rough handling and sharp objects are the main culprits—gentle transport prevents 99% of pops.
Key Takeaways
Balloon wedding centerpieces are one of the most underrated DIY wins for budget-conscious couples. You’re not just saving hundreds of dollars—you’re creating something that your guests will actually remember, photograph beautifully, and sit with all night long.
The key to success is simple: choose quality supplies, follow a tested assembly process, weight everything properly, and don’t overthink the design. Your wedding color scheme and theme already exist—the 15 ideas in this guide show you exactly how to translate those into balloon centerpieces that look professionally designed.
One final thought: Your centerpieces don’t have to be perfect to be beautiful. A centerpiece with a lopsided ribbon, greenery that’s a little wild, and balloons at slightly different heights reads as more charming and authentic than a sterile, over-engineered arrangement. The fact that you made them yourself? That story is the most beautiful part.
Ready to get started? Explore more wedding garland ideas to complement your centerpieces, and check out our guide on wedding aisle decoration ideas for a complete décor vision. You’ve got this.